martes, 7 de agosto de 2018

JUANA LA CUBANA GALA DANCISTICA AFIVIDA VIVA DANZA 2018

GALA DANCISTICA AFIVIDA VIVA DANZA 2018

HISTORY OF THE NUTCRACKER

HISTORY OF THE NUTCRACKER

The Classic Christmas Story Ballet
The origin of the Nutcracker, a classic Christmas Story, is a fairy tale ballet in two acts centered on a family’s Christmas Eve celebration. Alexandre Dumas Père’s adaptation of the story by E.T.A. Hoffmann was set to music by Tchaikovsky and originally choreographed by Marius Petipa. It was commissioned by the director of Moscow’s Imperial Theatres, Ivan Vsevolozhsky, in 1891, and premiered a week before Christmas 1892. Since premiering in western countries in the 1940s, this ballet has become perhaps the most popular to be performed around Christmas time. The story centers on a young girl’s Christmas Eve and her awakening to the wider world and romantic love. The composer made a selection of eight of the more popular pieces before the ballet’s December 1892 premiere, forming what is currently known as the Nutcracker Suite, Op. 71a, as is heard in Moscow Ballet productions. The suite became instantly popular; however the complete ballet did not achieve its great popularity as a Christmas performance event until almost 100 years later.
Performance History and the St. Petersburg Premiere
The first performance of the Christmas ballet was held as a double premiere together with Tchaikovsky’s last opera, Iolanta, around the Christmas holiday season on December 18 [O.S. December 6] 1892, at the Imperial Mariinsky Theatre in St. Petersburg, Russia. It is generally agreed that Lev Ivanov, Second Balletmaster to the St. Petersburg Imperial Theatres, worked closely with Marius Petipa, Premier Maître de Ballet of the St. Petersburg Imperial Theatres and widely regarded as the Father of Russian Ballet, to create the holiday ballet. It was conducted by Riccardo Drigo, with Antoinetta Dell-Era as the Sugar Plum Fairy, Pavel Gerdt as her Prince, Stanislava Belinskaya as Clara/Masha, Sergei Legat as the Nutcracker Prince, and Timofei Stukolkin as Uncle Drosselmeyer. More about Tchaikovsky’s classic ‘Nutcracker’ score
In Europe and the U.S.
The Christmas ballet was first performed outside Russia in England in 1934. Its first United States performance was in 1944 by the San Francisco Ballet, staged by its artistic director and Balanchine student Willam Christensen. The New York City Ballet first performed George Balanchine’s Nutcracker in 1954 but the holiday ballet did not begin to achieve its great popularity until after the George Balanchine staging became a hit in New York City. The now well known Christmas story has been published in many book versions including colorful children-friendly ones. The plot revolves around a German girl named Clara Stahlbaum and her coming-of-age one Christmas holiday. In Hoffmann’s tale, the girl’s name is Marie or Maria, while Clara – or “Klärchen” – is the name of one of her dolls. In the Great Russian Nutcracker, she is affectionately called Masha.

Composition History
Tchaikovsky accepted the commission from director of Moscow’s Imperial Theatres, Ivan Vsevolozhsky, writing to a friend while composing the ballet, “I am daily becoming more and more attuned to my task.” While composing the music for the charming Christmas story, Tchaikovsky is said to have argued with a friend who wagered that the composer could not write a melody based on the notes of the octave in sequence. Tchaikovsky asked if it mattered whether the notes were in ascending or descending order, and was assured it did not. This resulted in the Grand Adage from the Grand Pas de Deux of the second act where Clara/Masha dances with her magical Christmas present, the Nutcracker Prince. Among other things, the score of The Nutcracker is noted for its use of the celesta, an instrument that the composer had already employed in his much lesser known symphonic ballad, The Voyevoda (premiere 1891). Although well-known in The Nutcracker as the featured solo instrument in the “Dance of the Sugar Plum Fairy” from Act II, it is also employed elsewhere in the same act.
Moscow Ballet’s Great Russian Nutcracker 
Moscow Ballet’s version of the Nutcracker ballet, known as the “Great Russian Nutcracker,” includes other unique elements in the telling of the traditional holiday tale.  In the Moscow Ballet version, the setting is in Moscow and the city’s famous onion-domed skyline is featured as a backdrop. Traditional Russian folk characters Ded Moroz (Father Christmas) and Snegurochka (Snow Maiden) escort Masha and the Nutcracker Prince to their dream world in Act II. 
Finally the “Dove of Peace,” exclusive to Moscow Ballet’s version, welcomes the couple to the “Land of Peace and Harmony” traditionally called “The Land of Sweets.” The “Dove of Peace” was inspired by performances of Stanislov Vlasov, former Bolshoi Ballet dancer and choreographer/ballet master of Moscow Ballet’s inaugural 1993 Great Russian Nutcracker , and partner Lilia Sabitova, People’s Artist of Russia.
“The Russian ballet style is elegant, expansive, brimful with feeling, knockout male dancer…confers an unusual thrill, and...Kids…were wide-eyed with delight,” The New York Times,  Alastair Macaulay, Chief Dance Critic, 2010
“Perhaps one of the most magical moments of all, was delivered by a truly excellent Snow Forest corps, a veritable highlight excelling in both synchrony and grace. Both male and female corps were outstanding all night.” Calgary Herald, Stephan Bonfield 2014
“Acclaimed dancers Anatolie Ustimov and Alisa Voronova…lead a cast of traditionalists who treat theGreat Russian Nutcracker as the spectacular, globe-spanning institution that it is.” Denver Post, John Wenzel 2014
“[Moscow Ballet’s Great Russian Nutcracker]…lively and resourceful with an unusual array of bright, painted backdrops adding to the Christmas cheer…disarmingly poetic…faultless mastery of the steps…bravura expertise.”

The Great Ballet Tutu Post

The Great Ballet Tutu Post

Since I’m now on the subject of Ballet, let’s talk tutus. If I’m going to make one, even if it is just a costume for myself, I want to do it the right way; what can I say, I’m a perfectionist! I’ve been reading up on the subject and looking at some amazing pictures, and here is what I have learned.

First, there are five types of professional ballet tutus:

The Romantic Tutu
This is a long flowing tulle skirt, made of five or six layers and usually reaching somewhere around mid-calf.

The Bell Tutu
This style is well known as it was represented in many Degas painting (Edgar Degas is one of my favourite painters). It is short, stiff, and made of many layers of netting which are not supported by a hoop (contrary to the pancake tutu) and therefore falls a little in a bell shape.

The Pancake Tutu

The classical tutu that comes out straight from the hips, is short, has many layers of tulle and net and is supported by a hoop. Because of this support, the whole thing tends to bounce sometime after the dancer has finished a movement.

The Platter Tutu
Similar to the Pancake Tutu, the Platter Tutu sticks out straight from the dancer’s waist, but this style has a flat top.

The Powder Puff Tutu
Also known as the Balanchine/Karinska Tutu. It was developed by Barbara Karinska, a Russian born embroiderer turned Ballet costume designer. Balanchine loved great assembly of dancers in his ballet, but the traditional "pancake" tutu with its stiff wired layer would bob and dip when the dancers' skirts brushed up against one another and this bobbing and dipping would reverberate long after the steps were complete. Karinska devised the "powder puff" tutu, with a shorter skirt made of six or seven layers of gathered net, each layer a half inch longer than the preceding layer as a solution to this problem. The layers were tacked together for a fluffier, looser appearance (as opposed to the stiff "pancake" tutu). Because the shorter layers are self-supporting, no wire hoop is needed.

How does one construct one of these? First, you should know what the parts of the Tutu are.

The Bodice

Tutu Bodice illustration by Gwenyver
Shaped like a corset with shoulder straps, the tutu bodice must move and fit the dancer like a glove. It must feel like a second skin! Wrinkling or pulling fabric is unacceptable. It is strongly suggested that side pieces be cut on the fabric’s bias to take advantage of its stretchy nature.

The Basque

Tutu Upper Basque illustration by Gwenyver
This is the part that covers the dancer from the waist all the way to the crotch. It is shaped like a pair of panties if you like. It is a separate piece from the bodice, but it should match it and be made of the same fabric (cut on bias) if possible.

Tutu Lower Basque illustration by Gwenyver
Normally, it is made up of two parts: the upper Basque, which is the visible part that covers from the waist to the hips, and the lower Basque which is what you don’t see (not really) and looks like panties under the layers of tulle and net. The tulle is added layer by layer to each part before they are sewn together.
The Frills

Tutu Frills illustration by Gwenyver
What we always think of when we mention the word “tutu” is the frills. A tutu is made of on average 12 layers of frills, but it can go up to 16 layers for extra fullness. If a hoop is used, it will be placed in a casing on the 8th layer. As for length, it depends on the height of the dancer. Tututoday.com gives this rule of thumb for tutu’s length:
  • A dancer 5'8" or taller then can wear a 15 or 16" tutu.
  • A dancer 5'5" to 5'7" the she should be in a 13" to 14" tutu.
  • A dancer 5'3" to 5'4' then is best in a 12" to 13" tutu.
  • A dancer the 4'10 to 5'2" tall (tiny) works best in an 11" to 12" tutu.
Layers should be attached 15 mm from each other and be perfectly aligned on the basque, otherwise it will look wonky. You can trace your lines on the basque with a ruler and an L-square to make sure everything gets sewn on straight. For the tutu to be self supported, layers need to decrease in length, from the longest on top to the shortest at the very bottom. Again, according to Tututoday.com, this is how you should plan the cutting of your net fabric for all of your tutu layers.
  • Layer 12 (top): 12.5- (cut four widths of 54 inch fabric)
  • Layer 11: 12.0 -(cut four widths of 54 inch fabric)
  • Layer 10:10.5-(cut three widths of 54 inch fabric)
  • Layer 9: 9.5-(cut three widths of 54 inch fabric)
  • Layer 8: 8.5 -(cut three widths of 54 inch fabric)
    (the 8.5 layer is the wired layer in which a two inch strips is sewn to insert the wire.}
  • Layer 7: 7.0-(cut three widths of 54 inch fabric)
  • Layer 6: 6.0-(cut three widths of 54 inch fabric)
  • Layer 5: 5.0-(cut three widths of 54 inch fabric)
  • Layer 4: 4.0-(cut three widths of 54 inch fabric)
  • Layer 3: 3.0-(cut three widths of 54 inch fabric)
  • Layer 2: 2.0-(cut three widths of 54 inch fabric)
  • Layer 1 (bottom):1.5-(cut three widths of 54 inch fabric)
For younger girls (junior high and younger) it is appropriate to add baby frills from the top of the leg hole all the way down the crotch line. These are no longer than 1 to 1.5 cm once sewn.
One last thing (okay, two) that I have learned by reading the articles on Tututoday.com: never use cheap crinoline from the fabric store if you want to make a professional tutu – use petticoat net, it is more solid – and never, NEVER use a zipper for the basque or bodice – you can get professional basque closure for as little a 10$ a piece (from specialty store, but hey, what is Internet shopping for!).

Now if you are looking for links to find gorgeous tutus to drool on, go visit 
Tutu Devine and Rossetti Costumes.

Stage Makeup Essentials

A Dancer's Guide: Stage makeup essentials

When it comes to performance time, presentation is an incredibly important part of enhancing a dancer’s stage presence and building the atmosphere of a performance. Well done stage make-up can amplify a performance by highlighting a dancer's most elegant and expressive features, reflecting the mood of the piece and minimising any unwanted flaws or blemishes. Having a flawless face is also a big advantage when it comes to auditions and giving yourself an extra edge over other hopeful candidates. Stage make-up also serves the dancer by allowing them to completely immerse themselves in the performance with the help of the physical transformation that stage make-up creates.
To ensure everyone has all the tools to create the perfect stage makeup here is our guide to the essential products that will get you performance ready.
Stage Make-up Essentials for the dancer:

1. SERUM

Serum hydrates and moisturises the face – it’s lighter composition compared to moisturisers allows the hydration to penetrate deeper into the skin, in preparation for make-up to be effortlessly applied.


2. PRIMER

A good primer creates a smooth base for the foundation and ensures that make-up remains in place for as long as possible, (nobody wants to end up with a smudged-face disaster half way through a performance!).


3.  FOUNDATION

Foundation is crucial to providing the comprehensive, over-all coverage that creates an even, clear base under the revealing glare of the stage lights. ...In fact we're pretty sure that going on stage without good foundation coverage is classified as a cardinal sin. Right up there with stray pointe shoe ribbons and not warming up... You've been warned!

4.jpg

4.  BLEMISHES & DISCOLOURATION CONCEALER

Coloured concealer is excellent for camouflaging any pimples and blemishes, counteracting discolorations, lightening shadowed areas, disguising blemishes and scars and neutralising unwanted red patches and dark circles. It's the makeup equivalent of magic.


5.jpg

5.  CONCEALER

Once any facial discolouration has been evened out by the coloured concealer, a good neutral concealer will work in tandem with your foundation to create a healthy glowing, flawless skin-tone that can withstand even the harshest stage lights and leaves you ready for colour application.

6.jpg

6.     EYESHADOW

Eyeshadow is used to accentuate and draw attention to your eyes, and creates a more visible impact from on stage all the way back to the furthest rows of the audience. The shade of eyeshadow you wear will help to emphasize the style of dance you are performing or the role you're playing. E.g. Soft pinks, peaches, mauves and beige-brown hues are used to create the classical romantic eye worn by ballerinas.

7.jpg

7.     CONTOUR PALETTE

A contour palette is essential for enhancing facial structure and providing subtle definition to the face, neck and collarbone. Contouring is a key part of applying stage makeup, as it ensures that the concealer and foundation don't leave your face looking flat and one dimensional under the glare of the stage lights by re-defining and enhancing the structural features of your face.

8.jpg

8.     FINISHING POWDER

Finishing powders are a soft and silky powder used to blend or 'blur' any fine lines and wrinkles. It matifies the skin without altering the natural contours, and the sicilia minerals leave you radiant and glowing. ...Nobody has ever confirmed it, but we're preeeetty sure Sleeping Beauty worshipped this stuff; how else did she keep her skin that flawless?!

9.jpg

9.     GEL EYELINER (IN WHITE)

As far as make up essentials go, eyeliner is about as indispensable as it gets. White eyeliner, however, is the beauty industries greatest secret; acting as a mini highlighter, white liner can create the appearance of dramatically larger eyes and work to contrast black eyeliner for a more dramatic effect. Gel liners in particular also offer much greater control and precision over the line application, ensuring your eye makeup really is on point!
10.jpg

10. GEL EYELINER (IN BLACK)

Ah, good old black eyeliner; the little black dress of the makeup world! No makeup fit for stage is complete without the application of a crisp line of black eyeliner (or brown, if you're feeling playful) to finish the look. And when it comes to staying power, gel and liquid eyeliner will always trump powder-based liners, a big advantage when you're performing for several hours.
11.jpg

11. EYEBROW PENCIL

In this day and age we all know the importance of having strong eyebrow game. Thanks to the likes of fierce and fabulous females such as Cara Delevingne, Demi Lovato, Lily Collins and Lady Gaga, gone are the days of paper-thin brows. Today it's all about strong, immacualtely groomed definition, and there's no way you're getting there without a little help from some tweasers and a quality eyebrow pencil to get the most out of your beautiful brows.
12.jpg

12. MASCARA

Mascara is one thing that definitely doesn't need anyone to sing it's praises. If we had to worship one beauty product and one alone, then we would happily bow down at the shrine of Mascara. Mascara does such a nifty job of highlighting the eyes and giving you dramatic, bat-able bambi lashes that it's easy to see why some people forget to apply any other eye makeup... but whilst it's tempting just to whack a bit on your lashes and call it a day, remember that when combined with a nice eyeshadow and just the right amount of liner, mascara can make your eyes pop from on stage all the way back to the very last row.

Ballet Hair Ties Step and Styles. Make it By Your Self


Make it By Your Self


DANCER SHOES HOSTORY

History

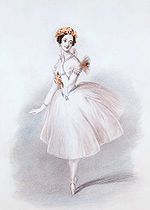
Marie Taglioni in the title role of La Sylphide, a ballet danced en pointe for the full length of the work.
Women began to dance ballet in 1681, twenty years after King Louis XIV of France ordered the founding of the Académie Royale de Danse. At that time, the standard women's ballet shoe had heels. Mid-18th century dancer Marie Camargo of the Paris Opéra Ballet was the first to wear a non-heeled shoe, enabling her to perform leaps that would have been difficult, if not impossible, in the more conventional shoes of the age. After the French Revolution, heels were completely eliminated from standard ballet shoes. These flat-bottomed predecessors of the modern pointe shoe were secured to the feet by ribbons and incorporated pleats under the toes to enable dancers to leap, execute turns, and fully extend their feet.
The first dancers to rise up on their toes did so with the help of an invention by Charles Didelot in 1795. His "flying machine" lifted dancers upward, allowing them to stand on their toes before leaving the ground. This lightness and ethereal quality was well received by audiences and, as a result, choreographers began to look for ways to incorporate more pointe work into their pieces.
As dance progressed into the 19th century, the emphasis on technical skill increased, as did the desire to dance en pointe without the aid of wires. When Marie Taglioni first danced La Sylphide en pointe, her shoes were nothing more than modified satin slippers; the soles were made of leather and the sides and toes were darned to help the shoes hold their shapes. Because the shoes of this period offered no support, dancers would pad their toes for comfort and rely on the strength of their feet and ankles for support.
The next substantially different form of pointe shoe appeared in Italy in the late 19th century. Dancers like Pierina Legnani wore shoes with a sturdy, flat platform at the front end of the shoe, rather than the more sharply pointed toe of earlier models. These shoes also included a box—made of layers of fabric—for containing the toes, and a stiffer, stronger sole. They were constructed without nails and the soles were only stiffened at the toes, making them nearly silent.
The birth of the modern pointe shoe is often attributed to the early 20th-century Russian ballerina Anna Pavlova, who was one of the most famous and influential dancers of her time. Pavlova had particularly high, arched insteps, which left her vulnerable to injury when dancing en pointe. She also had slender, tapered feet, which resulted in excessive pressure on her big toes. To compensate for this, she inserted toughened leather soles into her shoes for extra support and flattened and hardened the toe area to form a box.

Construction

Parts of a pointe shoe.
Every dancer has unique feet, with variations that include toe length and shape, arch flexibility, and mechanical strength. Consequently, most pointe shoe manufacturers produce more than one model of shoe, with each model offering a different fit, as well as custom fitted shoes. Regardless of the manufacturer or model, however, all pointe shoes share two important structural features that enable dancers to dance on the tips of their toes:
  • box within the front end of the shoe that encases and supports the dancer's toes.
  • shank, which is a piece of rigid material that serves to stiffen the sole so as to provide support for the arch of the en pointe foot.
The exterior of a pointe shoe is covered with fabric, thus concealing the box and other internal structural elements and lending an aesthetically pleasing look to the shoe. Most pointe shoes are covered with satin, but some are available with canvas exteriors. Pointe shoes are most often available in light pink colors and less commonly in black and white. When other colors are desired (e.g., to match a costume), pointe shoes may be dyed or, if available, ordered in custom colors.
The vamp refers to the shoe's upper piece, measured from the platform to the drawstring; normally, longer toes call for a longer vamp. The throat is the edge of the vamp above the arch of the foot; it is usually either v-shaped or round. The drawstring is located within the binding on the throat; this may be made from either elastic or lace.

Box

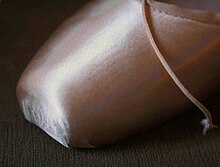
A pointe shoe's tightly stretched satin exterior exposes the shape of its underlying toe box.
The box is a rigid enclosure within the front end of the shoe that encases and supports the dancer's toes.[1] The front end of the box is flattened so as to form a platform upon which the dancer can balance, and fabric covers the exterior of the box for aesthetics.
In conventional pointe shoes, the box is typically made from tightly packed layers of paper and fabric that have been glued together and then shaped into an enclosure.[1] When the glue dries, it becomes hard and provides the required stiffness. In some newer pointe shoes, the box may be made from plastic and rubber, with rigidity provided by the plastic.[1]

Sole

The sole is thin and covers only part of the bottom of the pointe shoe so as to remain inconspicuous.
For most pointe shoes, the sole is constructed from a piece of leather that is attached to the shoe with adhesive and reinforced by stitchingalong its edges.[1] The sole overlaps and secures the unfinished edges of the shoe's exterior fabric. Pointe shoes may be manufactured with either scraped soles, which provide superior traction, or buffed soles, which have a smoother surface for reduced traction.
Aesthetic appearance is of paramount importance for modern pointe shoes. To achieve an elegant appearance, the shoe's more decorative outer fabric is prominently featured, covering the maximum possible area of the shoe's visible surfaces. To this end, the sole is made of thin material to give it a minimal profile, and a margin of satin is artfully pleated around it so that the sole covers only part of the bottom of the shoe.

Shank

The shank is covered by thin fabric, which in turn directly contacts the bottom of the dancer's foot.
Shanks are typically made from leatherplasticcardstock, or layers of glue-hardened burlap. The flexibility of a shank is determined by its thickness and the type of material used. A shank's thickness may be consistent throughout or it may vary along its length to produce different strengths at select points. For example, slits may be cut across a shank at demi-pointe to enhance roll through. Also, a shank's thickness may transition at some point along its length in order to implement differing strengths above and below the transition. Standard pointe shoes typically have a full shank, in which the shank runs the full length of the sole, or fractional (e.g., half or three-quarter) length shanks. Many pointe shoe manufacturers offer a choice of shank materials, and some will build shoes with customized shanks of varying stiffness and length.
Dancers will sometimes wear different pointe shoe models for different performance pieces. In such cases, the choreography often dictates the type of shank required; a lyrical style may call for a softer shoe, while an aggressive style with many turns is more easily performed in a hard, stiff shoe.

Ribbons and elastic band

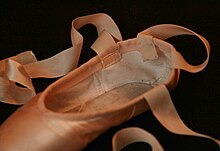
Ribbons and elastic band used to secure a pointe shoe to the foot.
A pointe shoe employs two fabric ribbons and an elastic band to secure it to the foot. Most of the work of securing shoes to feet is done by the ribbons. The two ribbons wrap around the dancer's ankle in opposite directions, overlapping one another so as to form a cross at the front. The ends are then tied together in a knot, which is then tucked under the ribbon on the inside of the ankle to hide it from view. The elastic band—which traverses the front of the ankle below the ribbons—keeps the heel of the shoe in place against the foot when the dancer is en pointe.
The locations where the band and ribbons attach to a shoe is critical, as incorrect placement can result in a poorly fitting shoe.[2] Optimal placement depends on the physical attributes of the foot to which it will be mated, and consequently the ribbons and elastic bands cannot be attached during the shoe manufacturing process. After acquiring a new pair of pointe shoes, a dancer must determine the appropriate attachment locations for the ribbons and elastic bands and then sew them, or arrange for them to be sewn, onto the shoes.

Demi-pointe shoe

demi-pointe shoe, which is also variously called a break-downpre-pointe, or a soft-block shoe, shares many characteristics with pointe shoes. For example, its outer appearance resembles that of a pointe shoe and it has a toe box, although the box is softer and the wings (sides of the toe box) are typically not as deep as those found on pointe shoes. Demi-pointe shoes are secured to the feet with ribbons and elastic band in identical fashion to pointe shoes. Unlike pointe shoes, however, demi-pointe shoes have no shank and, as a result, they do not provide the support necessary for proper pointe work.
Demi-pointe shoes are most often used to train dancers who are new to pointe technique. They serve to acclimate dancers to the feel of wearing pointe shoes and to strengthen the ankles and feet in preparation for dancing en pointe in pointe shoes. The toe box allows the dancer to experience the feel of a pointe shoe, while the insole and outsole work together to provide the resistance needed for developing foot and ankle strength.

Manufacturing process

Traditional pointe shoes are usually manufactured using a method known as turnshoe, in which each shoe is initially assembled inside-out on a last and then turned right-side-out before finishing.[3] When manufacturing standard pointe shoes, a standardized, common last is used for both left and right shoes, resulting in identical left and right shoes in a pair. Some ballerinas have custom-made lasts that replicate the shapes of their own feet; these may be supplied to a pointe shoe manufacturer for the purpose of manufacturing custom shoes.

Breaking in

Dancers typically "break in" new pointe shoes to reduce or eliminate the discomfort they commonly cause, usually by performing releves and eleves that flex, and thus soften, the boxes and shanks in a natural manner. Various other methods have also been employed for breaking in pointe shoes, including deforming them with hands or against hard surfaces, striking them on hard surfaces, and moistening or heating the boxes to soften the glues, but these methods may shorten a pointe shoe's usable lifetime.

Accessories

A dancer may experience discomfort while wearing a pointe shoe even after the shoe has been broken in. Several devices are commonly used to mitigate the discomfort:
  • Toe pads are pouches that encapsulate and cushion the toes from the unyielding box and prevent friction that can cause blistering. These are typically made from thin, fabric-covered gel sheets.
  • Gel toe spacers of various shapes and sizes are inserted between toes; these serve to adjust toe spacing and alignment so as to alleviate pain at the bunion joint between the big toe and first toe.
  • Lambswool is stretched and wrapped around toes to reduce chafing and the likelihood of blisters. After several uses, the lambswool becomes densely packed and custom fitted to the dancer's foot.
  • Tape is wrapped around toes to reduce chafing and blisters.
Toe pads
Toe pads
Toe spacers